How to Make a Book on Google Docs. Google Docs is a powerful and user-friendly word processing tool that allows you to create and edit documents online. One of the great features of Google Docs is the ability to create a book – a document that is divided into chapters or sections and can be easily printed or shared. Through this blog, I would like to walk you through the steps on how to make a book on Google Docs, and some other things you may need to consider.
Steps on How to Make a Book on Google Docs
Time needed: 1 hour
Here are simple steps to write your own book using Google Docs:
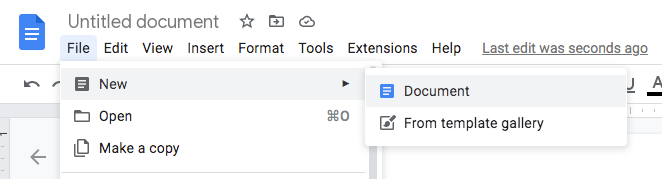
- Step 1: Create a New Document
To start, log in to your Google account and go to Google Docs. Click on the “+” icon to create a new document. You can also use the “File” menu and select “New” to create a new document.
- Step 2: Divide Your Document into Sections
To create a book, you will need to divide your document into sections or chapters. To do this, you can use the “Heading” styles in Google Docs. Simply select the text you want to turn into a heading and then select the appropriate heading style from the “Format” menu or the toolbar.
You can use different heading styles for different levels of headings. For example, you can use “Heading 1” for the main chapters of your book and “Heading 2” for the subchapters. This will help you organize your document and make it easier to navigate.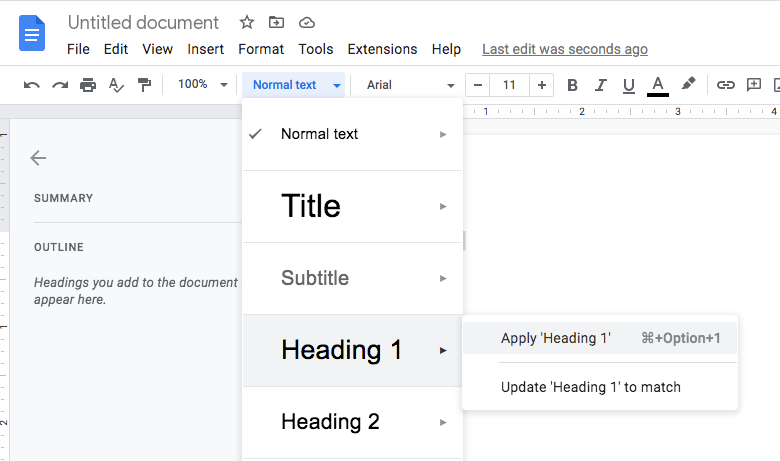
- Step 3: Add a Table of Contents
A table of contents is an essential part of any book as it helps the reader navigate through the different sections and chapters. To create a table of contents in Google Docs, you will need to use the “Table of Contents” feature.
To add a table of contents, go to the “Insert” menu and select “Table of Contents.” You can then choose the heading levels you want to include in your table of contents and customize the appearance of the table.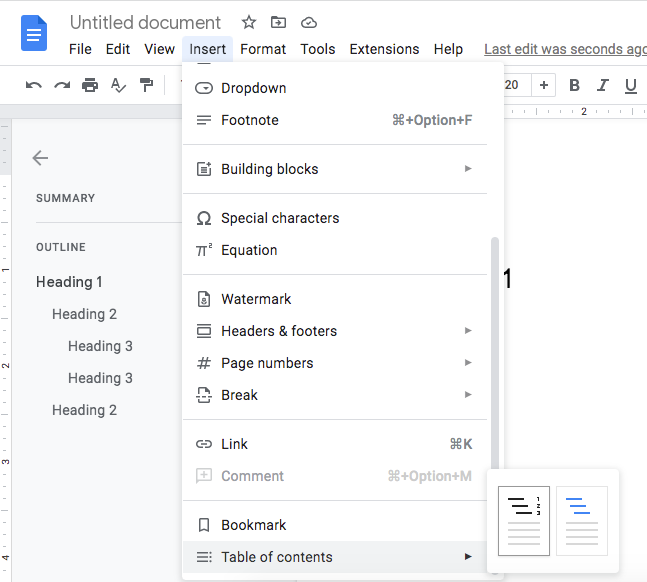
- Step 4: Add Images and Other Media
Adding images and other media to your document can make it more visually appealing and engaging for the reader. To add an image to your document, go to the “Insert” menu and select “Image.” You can then choose an image from your computer or search for one online.
You can also add other types of media, such as videos or audio files, to your document. Simply go to the “Insert” menu and select the appropriate option. - Step 5: Share and Publish Your Document
Once you have completed your book, you can share it with others by sending them a link or by publishing it to the web. To publish your document to the web, go to the “File” menu and select “Publish to the web.” You can then choose the options you want, such as whether to allow others to edit or comment on your document.
Creating a book on Google Docs is a simple and efficient way to organize and share your content. By following the steps outlined above, you can create a well-organized and visually appealing book that is optimized for search engines. Whether you are creating a book for personal or professional use, Google Docs is a great tool to help you get the job done.
What to prepare before writing a book in Google Docs?
Based on my experience, simply start writing your own book in any word processor will only make it difficult to accomplish. Thus, I would like to suggest you that there are things to prepare to avoid such difficulties like what I did. Here you go:
Before you start writing a book in Google Docs, there are several things you should prepare to ensure that the writing process goes smoothly and efficiently. Here are some key things to consider:
- Determine your topic and target audience: It’s important to have a clear idea of what you want to write about and who you are writing for. This will help you focus your content and tailor it to your intended audience.
- Create an outline: An outline can help you organize your ideas and ensure that your book has a clear structure. You can use the heading styles in Google Docs to create your outline and divide your document into sections or chapters.
- Gather research materials: If you are writing about a specific topic, you may need to do some research to gather information and ideas. Make sure to have all of your research materials on hand so you can easily reference them as you write.
- Choose a document template: Google Docs provides a variety of templates that you can use to create your book. These templates can help you get started and save time by providing a basic layout and formatting.
- Set aside dedicated writing time: Writing a book can be a time-consuming process, so it’s important to set aside dedicated time to work on it. Choose a time that works best for you and try to stick to a regular writing schedule to make progress.
- Get feedback: As you write, it can be helpful to get feedback from others to ensure that your book is on track and meets your goals. Consider sharing your work with friends, family, or other writers for feedback and suggestions.
You may need to use template
Yes, Google Docs provides a variety of templates that you can use to create your book. These templates can help you get started and save time by providing a basic layout and formatting.
To access the templates, go to Google Docs and click on the “Template gallery” icon in the top right corner. From there, you can browse through the available templates and select the one that best fits your needs.
Some of the book writing templates available in Google Docs include:
- Novel template: This template is designed for writing a novel or long-form fiction. It includes chapter headings and a table of contents to help you organize your content.
- Children’s book template: This template is designed for writing a children’s book and includes illustrations and space for text.
- Memoir template: This template is designed for writing a memoir or personal story and includes chapter headings and a table of contents.
- Self-publishing template: This template is designed for writers who are self-publishing their work and includes a cover page, table of contents, and chapter headings.
Here some some Google Docs Book Template
You can also create your own custom template by formatting a document the way you want it and then saving it as a template. To do this, go to the “File” menu and select “Save as template.”
Customizing the template
Keep in mind that these templates are just a starting point and you can customize them to fit your specific needs. You can add or remove elements, change the formatting, and add your own content to create a unique and professional-looking book.
Printing a Book in Google Docs
After writing and finishing your book it’s time to print it for easy-reading.
To print a book from Google Docs, follow these steps:
- Open the document you want to print in Google Docs.
- Click on the “File” menu and select “Print.”
- In the “Print” window, select your printer and choose the print options you want, such as the number of copies and the page range.
- Click on the “Print” button to start the printing process.
I would like to tell you that Google Docs does not have a built-in book printing feature. If you want to print your book in book format, with a spine and cover, you will need to use a third-party printing service or print the document yourself and bind it.
To print your book yourself, you can follow the steps above and print the document in sections or chapters. You can then cut the pages and bind them together using a binding method such as saddle stitch or perfect binding.
If you prefer to use a third-party printing service, there are many options available that can print and bind your book for you. You can search online for book printing services and compare prices and options to find the one that best fits your needs.
Regardless of how you choose to print your book, it’s a good idea to proofread and check the layout and formatting before printing to ensure that the final product is of high quality.
Collaboration and Proofreading
Writing a book is about to put all your perception into a page that everyone can read. However, what others perceive might be a whole lot different from what you actually wanted to convey. In that case you need proofreading in terms of not just grammatical error or typography problems but also the content.
FOr this purpose, Google Docs makes it easy for you to collaborate.
To share a book written in Google Docs for proofreading with friends, you can follow these steps:
- Open the document you want to share in Google Docs.
- Click on the “Share” button in the top right corner of the screen.
- In the “Share with others” window, enter the email addresses of the people you want to share the document with.
- Choose the “Can edit” option to allow your friends to make changes and suggest edits to the document. Alternatively, you can choose the “Can comment” option to allow them to leave comments but not make changes.
- Optionally, you can add a message and set an expiration date for the sharing link.
- Click on the “Send” button to send the sharing link to your friends.
Your friends will receive an email with a link to the document and can access it by logging in to their Google account. They will be able to view the document and make changes or leave comments as needed.
You can also use the “File” menu and select “Publish to the web” to publish your document to the web and share a link to it with others. This will allow anyone with the link to view the document, but they will not be able to make any changes.
Built in Collaboration system for commenting in Google Docs
You can also use Google Docs’ built-in collaboration features, such as the “Suggestion” mode and the “Comment” feature, to collaborate with your friends on the document in real time. This can be especially useful for proofreading and editing as you can see and respond to each other’s comments and suggestions in real time.
How to save a book in Google Docs into PDF format?
If you want to save your book to your computer, and share it to your friend through social media like WhatsApp, facebook, and the likes, you need to present it in pdf format.
To save a book written in Google Docs into PDF format, follow these steps:
- Open the document you want to save as a PDF in Google Docs.
- Click on the “File” menu and select “Download” and then “PDF Document (.pdf).”
- The document will be downloaded to your computer as a PDF file. You can then open the PDF file with a PDF reader or viewer, such as Adobe Acrobat or Foxit Reader, to view or print it.
Alternatively, you can use the “Print” feature in Google Docs to save the document as a PDF. To do this, click on the “File” menu and select “Print.” In the “Print” window, select “Save as PDF” as the printer and click on the “Save” button. The document will be saved as a PDF file on your computer.
When you save a document as a PDF, it becomes a static, non-editable file. If you want to make changes to the document later, you will need to open it in Google Docs and make the changes there.
You can also use third-party tools to convert your Google Docs document to PDF. These tools often provide additional options and features, such as the ability to merge multiple documents into a single PDF or to password-protect the PDF. You can search online for PDF conversion tools to find one that meets your needs.