Want to make brochure fast? use our curated brochure template for google docs, words, power points, and google slides. With free brochure templates for Google Docs, everything will be easy.
Before copying the template file, please make sure that you have logged in to your Google account. To learn more, please read: How to make a copy of a file in Google Drive
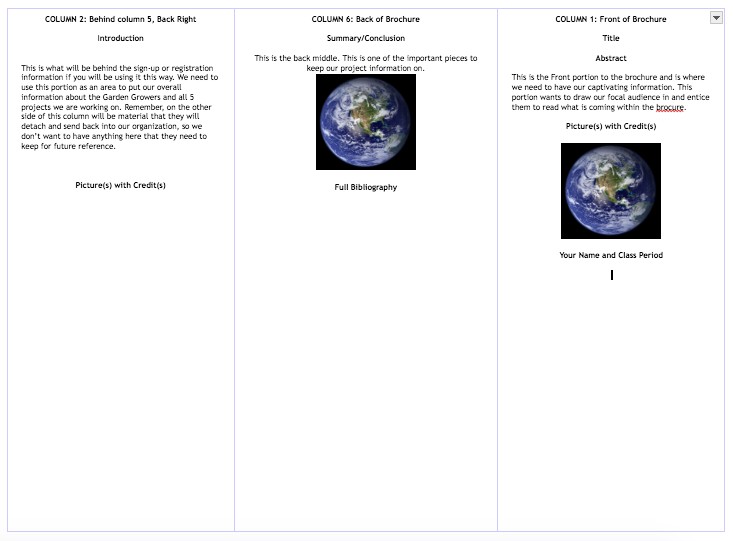
Google Docs Trifold Template
3 Fold brochure template for google docs. The Google Docs brochure template can be downloaded and edited in power point, or edit this google docs brochure online through google slides in google drive. Enjoy the PPT brochure templates:
Trifold brochure template google docs
tri fold brochure template.ppt
By using this Google Docs Trifold Template, you will know how to make a trifold brochure on google docs.
Download:


School

Yellow style Google Docs Trifold Template with school kids photo
Download:
Restaurant

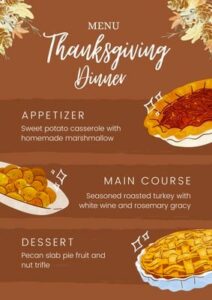
This brochure template is suitable for restaurant promotion. Most brochures used in restaurants are for displaying menu offered in that restaurant. Thus, it actually serves either as promotion and profiling or as food lists.
Download:
University / College

Promoting a university or college is a must to stay relevant. Campus existence must be exposed to public. This university brochure can be a good starting point.
Download:
Bifold brochure template google docs
Bi fold brochure template for google docs and power points. Choose any, download, or preview it first. They are all basically PPT brochure templates. Ready to create brochure in google docs?
Bifold brochure template / two sided brochure template
free bi fold brochure template word. blank brochure templates.
Download:
travel brochure template google slides
another two sided brochure template free
Download:
Simple School / college brochure templates

This is a free education brochure template
Download:
Food brochure template for google drive
bifold brochure template. Another two columns brochure template for google drive.
Download:
Want to create brochure in google docs with more designs? continue below:
Furniture Catalogue

Download:
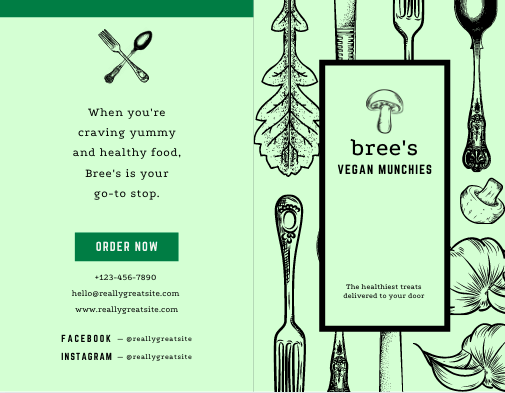
Vegan Menu
Download:
Daycare / Kids School
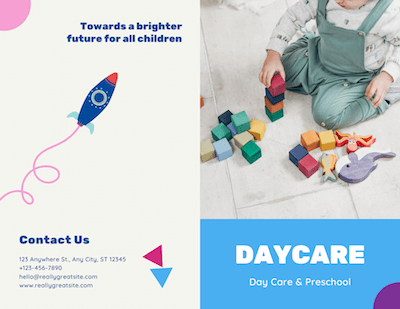
two page brochure template
Download:
Vets / Pets Care

Download:
Tri Fold Microsoft Word & PPT brochure templates
The following section contains Microsoft Words based brochure of pamphlets designs. They are arranged in three fold. To edit these brochure template in word is actually the same way as editing the trifold brochure template as explained before with the google docs version.
This is a trifold science brochure template. as the name suggests, this layout was used for science information. It may be about science projects, or science club. There are three columns. It is good for those who likes clean design.
If you want to emphasise more on the information rather than the design or the look, than this design is for you.
here is the file to copy
Pamphlet template word
Don’t be confused of the term pamphlet template word with the brochure term. They are actually the same. Thus, if in the past what you know about this document page is for promoting a specific matter such as business as a pamphlet, now you know that it is actually a brochure. Hence, here is the pamphlet template word that you are looking for.
Educational microsoft word tri fold brochure template free
word document brochure templates
Download:

Property brochure template doc

6 panel brochure template
Download:
Google Slides brochure template
If you need google slides brochure template, here are the two blank template for brochure making that we can provide. There is free blank tri fold brochure templates that you can edit in Google Slides or power point.
brochure google slides template Trifold
Download
slides brochure template bifold
Need one page? check: one page brochure template word
Additional Brochure Templates (Merged)
The following content is moved here from other page in edutechspot.com. It contains other brochure templates created by edutechspot.com. Here is the post content:
Hi! welcome back to edutechspot.com. Schools always deal with printable documents like brochures, flyers, posters, invitations, programs, agenda, awards, reports, and many others for various purposes. It is a daunting task to create those documents from scratch. Not all educators are familiar with graphic design software like adobe photoshop, illustrator, indesign, CorelDraw, and so forth. In fact, most teachers can use microsoft word, powerpoint, google doc, and google slides. Besides their being easy to use, these software are available in most computers, and some are free. Teachers who cannot afford the price of commercial software can use the free ones.
I would like to help other teachers by creating (adopting, and adapting the existing) templates in powerpoint so that other teachers can download for free and to easily edit. I will always update the number of documents in this page as I craft the new one. I am happy to share and I am open for suggestion and requests. Just fill in the comment to request specifically. Here are my templates for you:
Free Editable School Brochure Templates created with powerpoint
School Project Template 2 Pages front and back

This 2 page front and back flyer template can be used to inform news or school project related to biology or others. The brochure is dominated with green and blue. You can change the leave image with any picture you need. Change the logo with your school or organisation logo. You may as well change the kid photo in the front page. You can edit this brochure using microsoft power point or google slides.
Download: Edutechspot.com-Flyer-Template-School-Project biology
School Project Template Sport

This brochure can be used to display sport school project. As this is only a template, you can use it to display various information. It can be used for invitation to attend school sport competition. The colour scheme is brown, yellow, and green.
Download: Edutechspot.com-Flyer-Template-School-Project
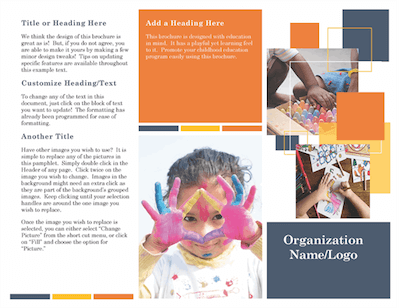
Brochure Template Red
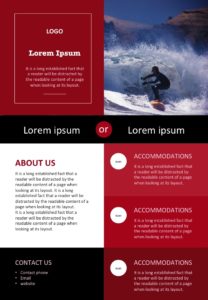
I was inspired by a template design I found on google image. It was simple and elegant with red and black color dominating the page. White section is for the about us and blue picture about a surfer at the right top corner. I adapt and adopt some parts of the design. So, I remake it in power point so that it is easy to edit for further use. Change the font size and font family as needed. You can also put logo on the left top. The white circle bullet in the red section can be altered with any icon suitable with the information. The text is still in lorem ipsum. Be free to replace with yours.
One page School Program / Teaching pamphlet template
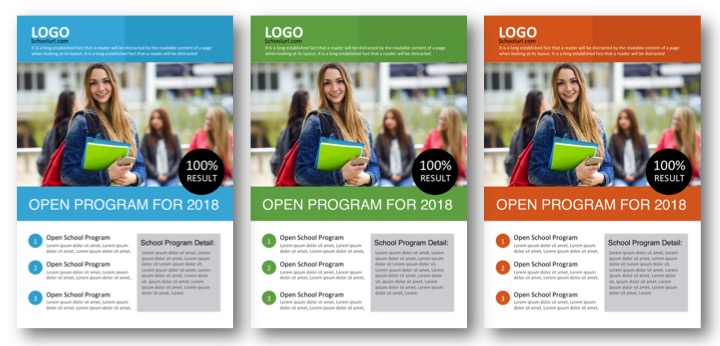
Another inspired brochure template on the internet. This time I tried to create three colors for school new program. The picture was taken from freepik.com here is the url:
https://www.freepik.com/free-photo/smiling-student_1015285.htm#term=students&page=1&position=4
You can change the photo with the one you desire. Select one of the three colors. You can also change with any color that suits your needs. I use some fonts that are available in most computers. Change the fonts as needed. Use google slide or microsoft power point to edit this template. Before printing, you can export or save it as pdf. Here is the download link. Enjoy and share. :)
Download: school program flyer Template Blue, Green, Red
College and New School Year Admission Brochure Template A4 Blue, Orange, Pink

This brochure template is for announcing a new school year program admission. Use the flyer to market your institution. This educational brochure is editable using google slide or power point. You don’t need advanced skill in using graphic design software. Just use the regular ones (power point and google slide). The page size is A4. If you need A3 size which is larger, you can edit the page size but be careful of the stretch. If you need a help with editing, contact me via comment or contact page.
I set the color to three, blue, orange, and pink. Of course you can select your desired colors. Feel free to modify. Here is the download link.
Educational handout template
Download: College School Admission Education template Power Point
If you are interested in other kinds of brochure or other similar design like poster or flyer, we have research poster template that you can download or copy to your google docs for free.
How to Create a Brochure in Google Docs?
Time needed: 1 hour
Follow each step to effectively create a trifold brochure in Google Docs. You will need your creativity and imagination to make it more beautiful. Don’t hesitate to experiment. Here are the steps:
- Adjust the Page Setup
First, I assume that you already know How to create a new blank document in google docs. After creating a new blank document, don’t forget to name it. In this example, I name my document exactly the same as the purpose I am writing the tutorial, that is “How to make a trifold Brochure in Google Docs”.
After that, we need to change the setup of the page. We want to make it landscape. By default, the page orientation in google docs is portrait, so we need to change it. To access the page setup settings: click on the file menu, and then go to Page Setup. See the image to get clear instruction.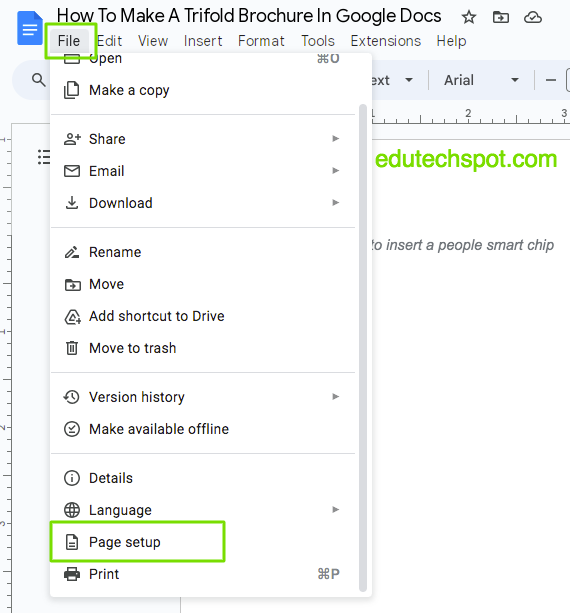
- Edit the parameters
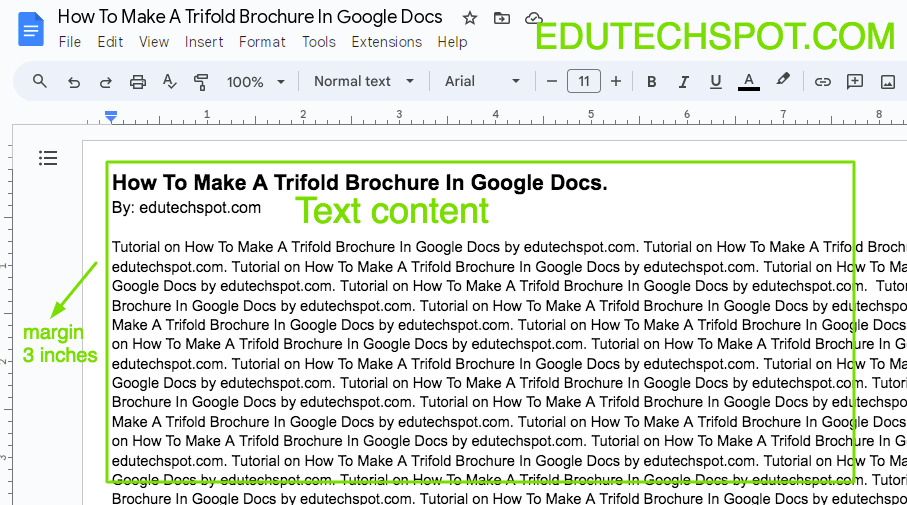
Now, edit the parameters. For starter, just follow my sample. In this sample, please make sure that you open the “pages” tab, then, make sure that the “apply to” is set to “whole document”, then the Orientation should be “landscape”, the paper size is “letter”, the page colour is “white”, the margins (important): top, bottom, left, right are all 0.3 inches. After that, click ok.
We chose the landscape page orientation because we are making trifold brochure because mostly, trifold brochures are in landscape format. Thus, it will make it easy for the designer to layout it in three columns.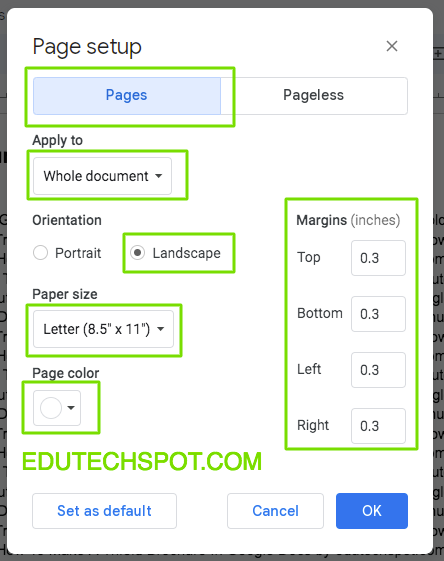
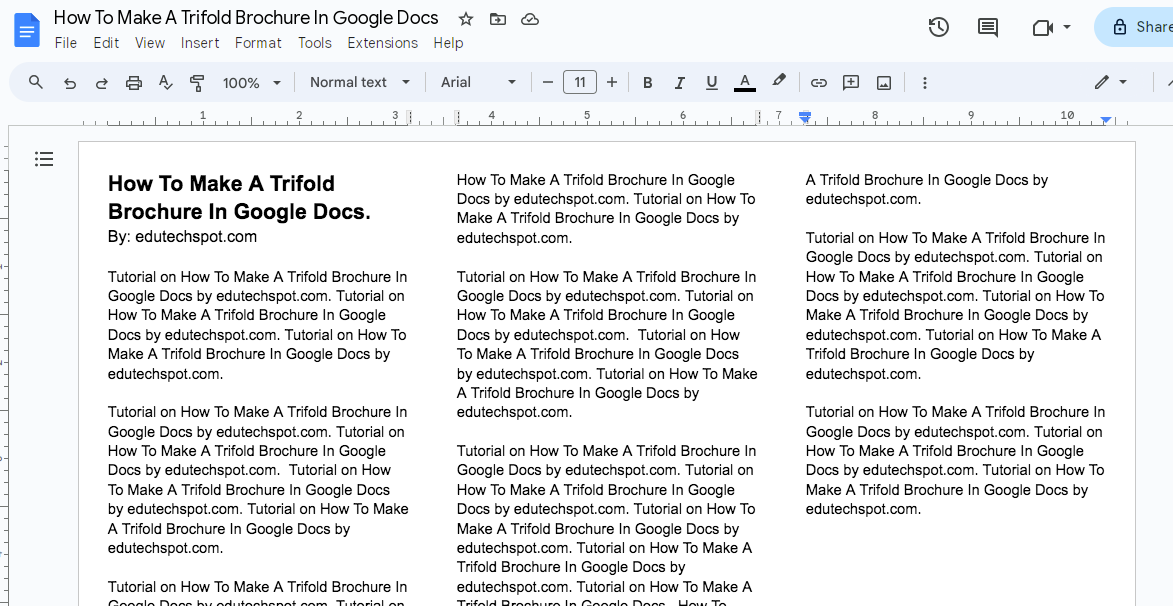
- Fill in the text content
Next is that we need to put text content into the brochure. This will enable us to view the whole design. Prepare any text you want. You can just write a sentence, and than multiply it by copying and pasting. You can arrange it into several small paragraphs.
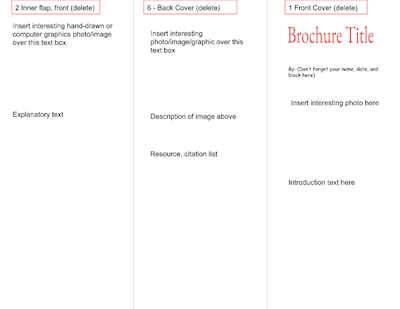
- This is how to make Trifold Brochure
Create three columns: We are going to create three columns for the page. To do so, click on the “Format” tab, and then go to “columns”, and than choose the three columns icon.
NOTE: You can create double sided brochure by creating two pages front and back, make sure you set the same margin.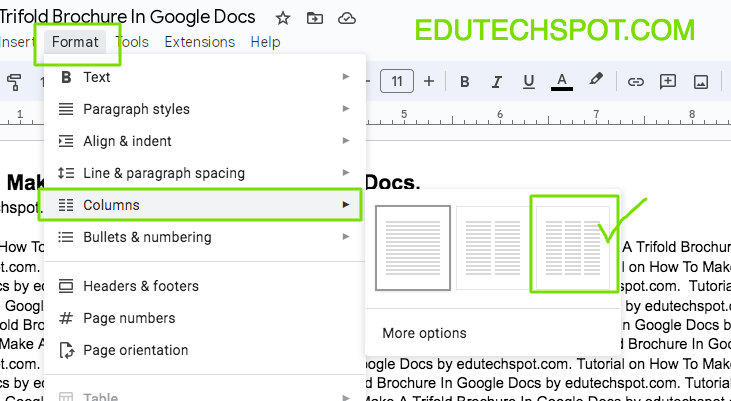
- Adjusting the content paragraph, sub heading, and more
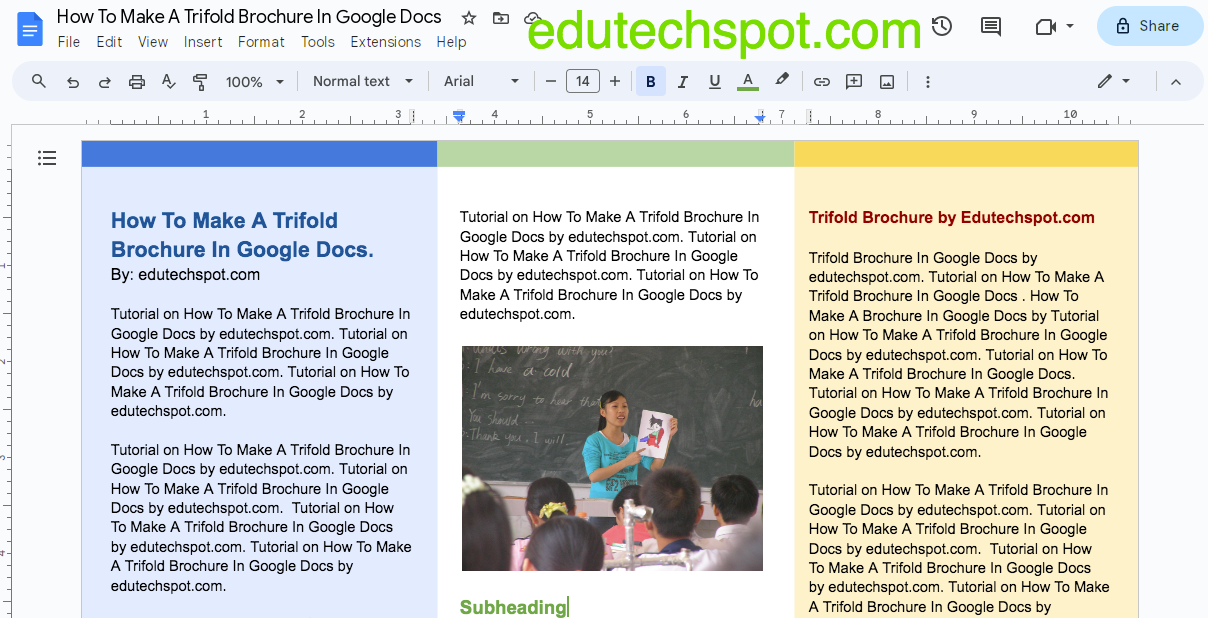
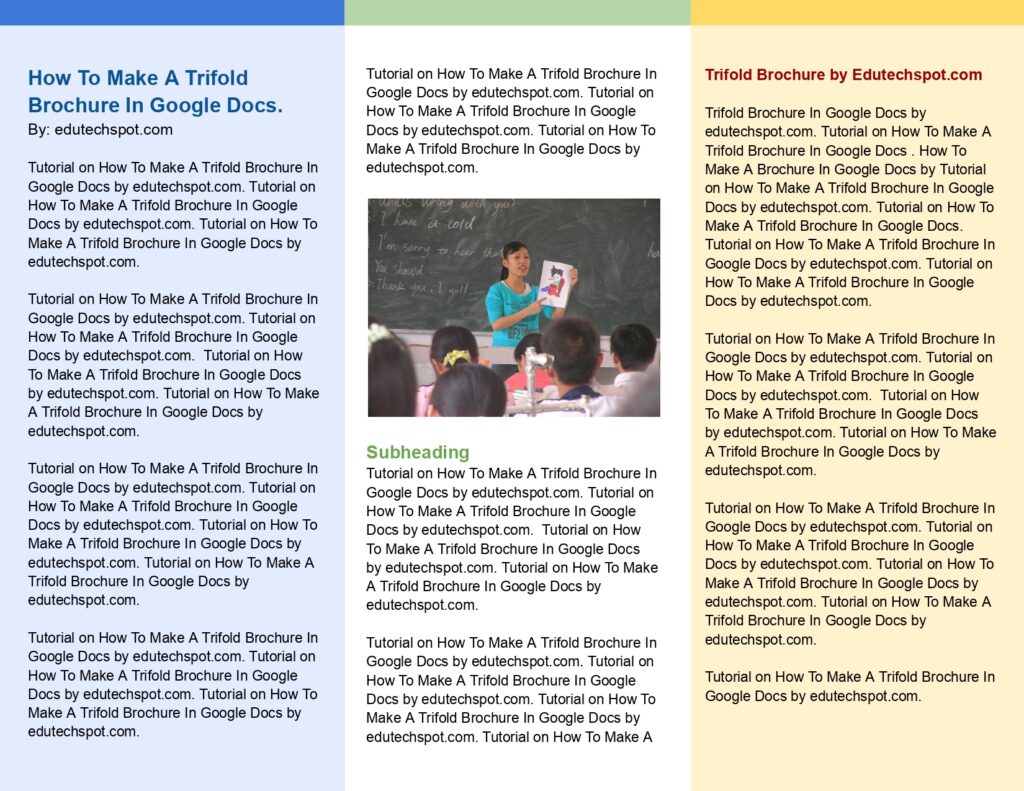
Once the page is divided into three columns, you can adjust the text content to make it neat and beautiful. In my sample, I also add heading, the writer, and the content. As you can see, I also chunks the paragraph into smaller ones, for aesthetic purpose. In addition, small paragraphs make it easy for the user to read. Here is how it looks: nice, right?
- Adding Image to the Brochure in Google Docs
Next, we will add another common element found in a brochure, picture. Yes, we will add an image into the brochure. You can add an image by uploading it from your computer, or google drive, or google photos, or by inserting url of an image you found online, or by taking new using camera (using laptop or smartphone depending on the device you use to open this page).
In this example, I choose “Search the Web”. This is because I do not have enough collection of photos suitable for this sample. So here is how to add image from the web: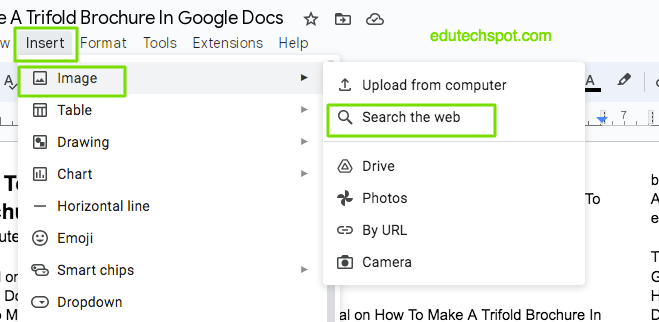
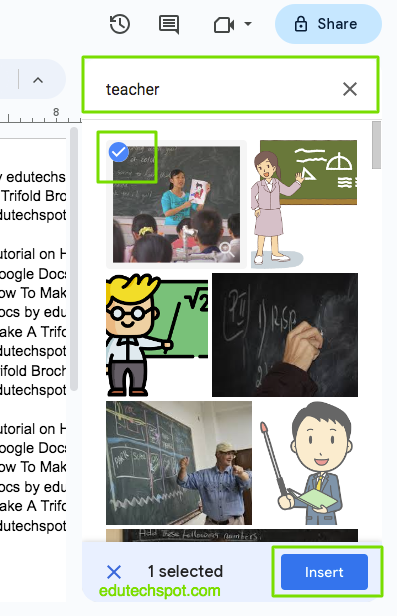
- Adding Image from internet or various sources
searching, selecting, and inserting image from internet to the page. Once you click on the “Search the web”, a window in the right panel will show you a search bar. In this example, I typed “teacher”, and I got the image as shown in the illustration below. Once you have the choice in mind, select the image, and click insert button. In this example, I choose the first one. You can see that there is a check mark on the corner of the image I selected.
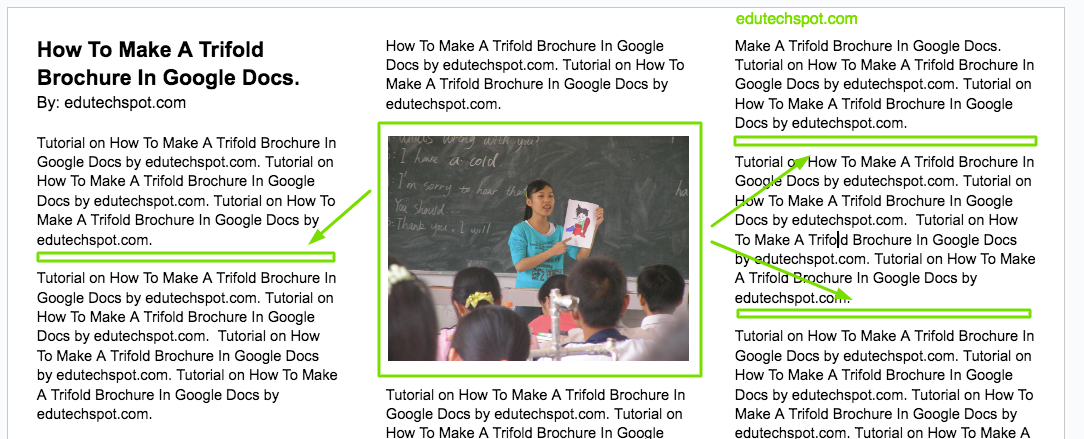
- Position the image anywhere wanted
position the image: Next is to put the image wherever you like in the page. You can put it in the first column, in the second column, or in the last column. You can put it between two paragraphs. In the illustration below, I mark some sample places you can put the image into. In this example, I put the image in the middle column. If you want to create your own image of illustration, you can try digital art websites.
- Adding Border as Decoration
adding border as decoration: To make the Google Docs trifold brochure more beautiful, we can add some decoration. One of kinds of decoration is border. I like using border for decorating my brochure. Border, with specific colour can provide beautiful accent, yet elegant to bring the brochure Come to life.
To add border as decoration, Go to the tab “insert”, then go to “Drawing”, and go to “New”. See the following illustration.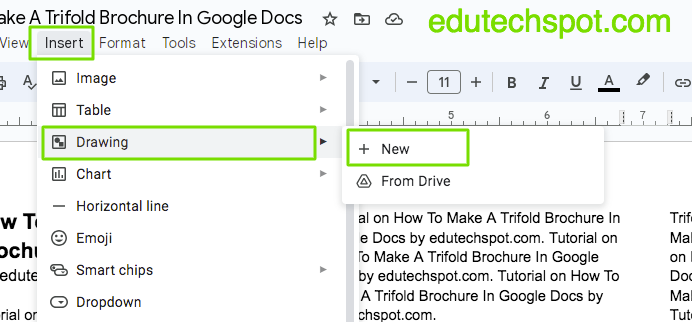
- Create Border using Shape in Google Drawing
create border using Shape: In this example, I want to use shape to create the border for my brochure design. Once you click on the “new” menu, as instructed before, there will appear a window of Google Drawing. That’s right, Google Drawing. Why not in the google docs? Because Google Docs does not support creating shapes directly in the editor. It needs the help of another app, in this case “Google Drawing”. Ok. So now you are in google drawing, please locate the insert shape icon, and than go to “Shapes”, and than click the “rectangle” one.
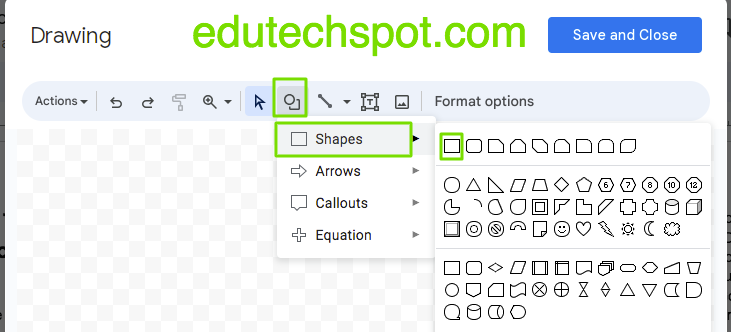
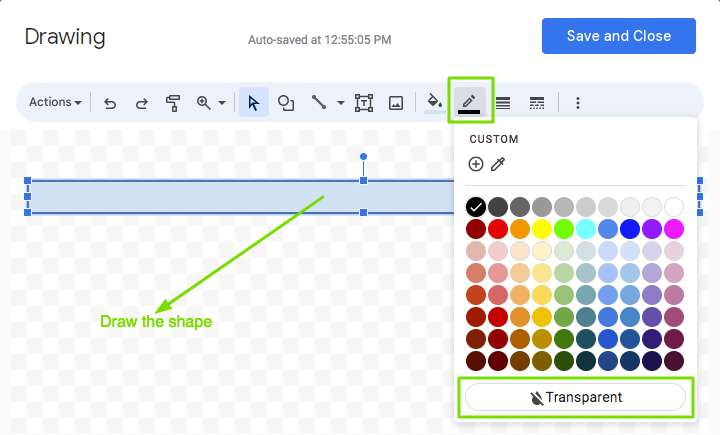
- Draw the border using shape and set outline to transparent
draw border: After that, you can draw a shape like the one I show in the picture below. After clicking and dragging to create the shape, please change the border line to transparent. You can actually let it be with the border, but in my experience of designing a brochure and other types of documents, it is much more beautiful to set it transparent or no line. To do so, see the image and follow the steps. Follow what I highlight in the image.
- Adding color to the shape
adding color: After setting the border colour to transparent, that is to make it borderless, now please add the colour to the shape itself. In this example, I chose blue. You may want to choose your own colour. I just picked what was available in the default setting.
If you want more colour, you can select plus button, then there will appear settings for choosing different colour from various ranges of different colours.
You can also choose gradient if you want. As you can see in the image below, there is a gradient tab next to the Solid colour tab. Click on the gradient tab, and you can see some colour options that you may be interested in.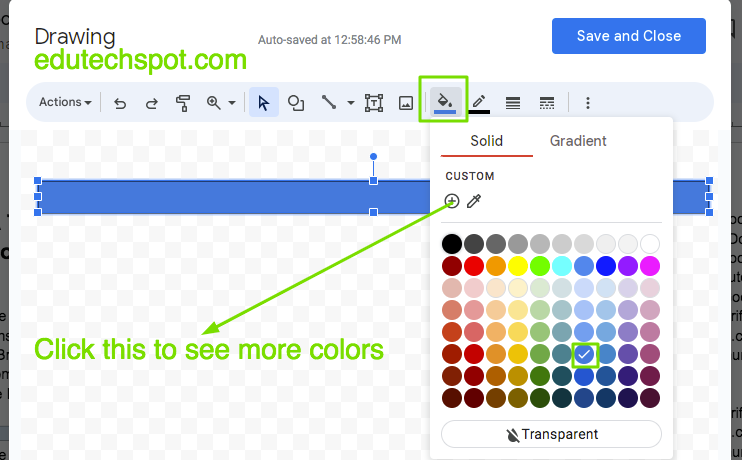
- Change the positioning of the shape
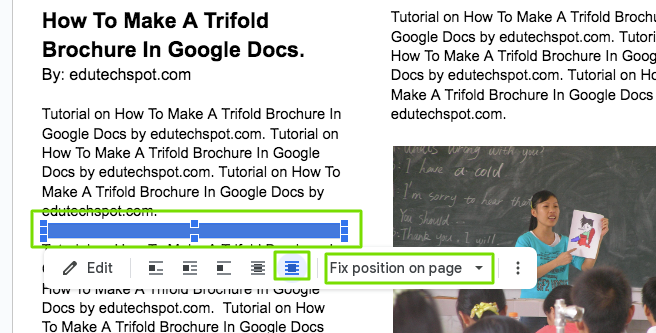
change shape position: The shape that you just created will appear somewhere in the page, depending on the cursor position. The next important setting is to change the positioning of the shape. This is super important. Click on the shape to activate it. You will see the setting appearing. Change the position to be “IN FRONT of TEXT” and “FIX POSITION ON PAGE”. This will make the shape to appear on the upper layer of the text, and is movable to anywhere in the page without breaking the paragraphs layout.
- Put the shape on top of page
put on top of page: I decided to put the shape on top most of the page. This is to create an illusion that it functions as a border. I repeat this process by copying and pasting the shape, and then move each to the next columns, and change the colour to create a trifold brochure section.
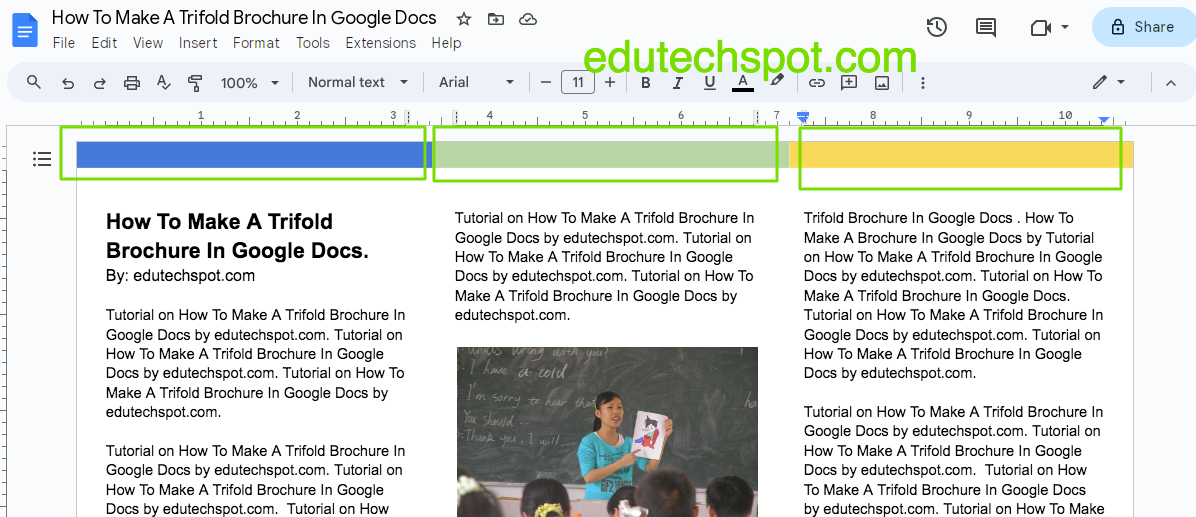
- Adding background
adding background: Furthermore, to put more detail separation of the three columns, I want to make each column looks different by giving each different background colour. To achieve this, I copy and paste the border shape I created before as the top border. Then, I change the colour to a brighter one. For the first column, because the top border is blue, the background colour of the first column is also set to blue, but brighter. Next, Expand the shape to cover the whole column vertically. See the example below.
NOTE: At first, the shape will cover the entire first column, and thus the text is covered. you have to change the setting of the position to be “BELOW THE TEXT”. This way will make the text to be in front of the shape. The text will be readable again, and the shape will act as the background. Similarly, you can repeat this process to the next column.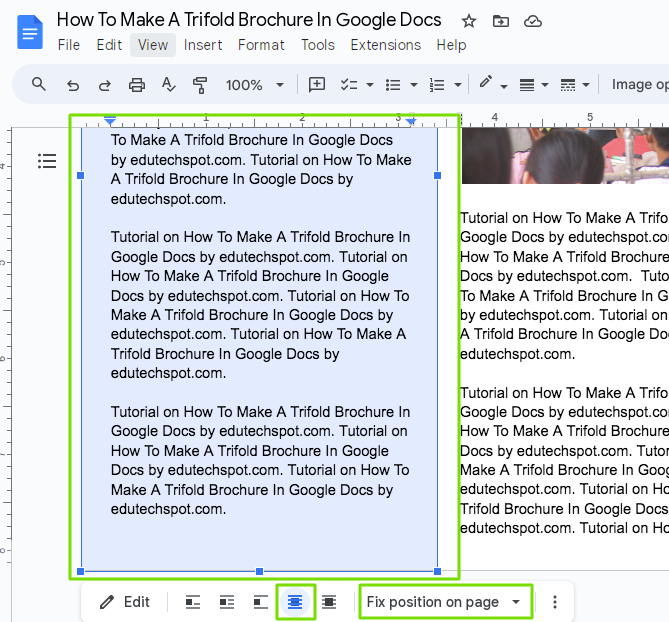
- Add more elements until final result
add more elements until final result
Final Result
How to make a pamphlet on google docs
Based on the definition that a pamphlet is a page/paper usually one page but folded half, you can assume that creating a pamphlet means creating bifold brochure. That means you can follow these steps:
- Learn how to create trifold brochure, this is because that tutorial is clear enough. the only different is that you divide the page into two columns instead of three.
- Set the margin, make sure that it is not to narrow
- add images, sub headings, backgrounds, and texts as you need.
- If you want to make it faster, you can use the bifold brochure layout because this is exactly as defined as pamphlet.
Who uses brochure on Google Docs?
Brochure templates are important for nearly any body and any party, individuals, groups, communities, bussiness (profit and nonprofit), and manymore.
Brochure templates will make it easy for us to create announcement about our products and services.
Health Care Brochure
A healthcare company or groups may need to share information about how to give special treatments to diabetes, cancer, nutrition, nursing, medication, dental care, a specific desease, pregnancy, home care, or any purposes related to health and medical.
Educational Brochure Template Free
Educational sector like school, college, and university may occassionally need to issue information in form of brochure. It can be like about a specific conference (usually universities conduct annual conference in which researchers present their research findings). Furthermore, It can also be a specific program like summer camp, science exhibition, floral exploration, museum visit, a special coaching program, etc. You can add your custome images and pictures. To make your own, you can use free digital art websites.
Small Group / Community Brochure
A small group of school students may sometime need to make brochure too. For example, a soccer team profile needs to be share to rest of the students in a school. The team may do a recruitment for a new team member. In addition, Another example is a simple school election. The team may also need to create a fund raising campaign to support the team financial so that the team can get sponsorship. The development of the team will also be a good starting point for each team member’s career.
Hospitality Brochure
Another bussiness sector that frequently need brochure templates is hospitality, like hotel or resort. A hotel can display its services like vip rooms, standard rooms, and facilities like swimming pool, etc.
Tour and Travel Brochure
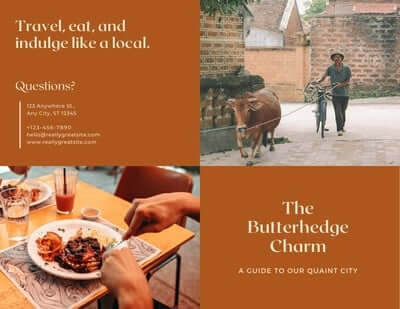
When talking about hotel, we cannot forget about tourism, and thus a tour agency will alyways need to provide brochure containing its services and tour programs. A tour service will usually cover travel services in which tourist may need to visit specific spots in a city.
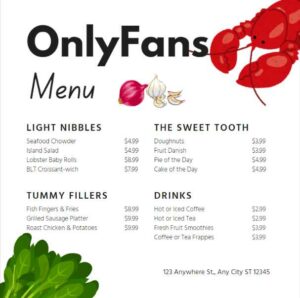
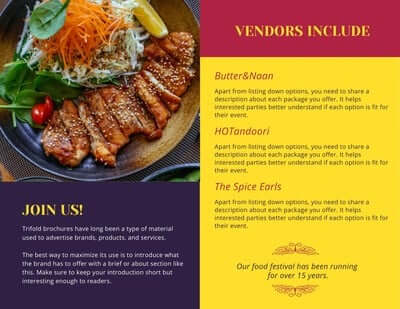
Restaurant / Food Menu Brochure
A restaurant owner would always love to share its price list including the photos of the menu, dessert, and all offered. Having a good marketing team to create beautiful brochure can boost sales.
Real Estate Brochure
Property sector is another business that requires to exhibit houses so that prospective buyers see how the houses that they want to buy look. Real estate agency surely need brochure templates to make publication easier. Any corporate sectors do need it too.
Brochures are useful for many purposes because the main goal is to share information.
Brochure template for google docs in Sizes and Layouts
Brochure can be used to share any type of information and it comes in different sizes and layouts. In fact, a brochure with 2 pages or people call it bifold / bi fold / 2 fold is actually a 4 page brochure because when folded into two folds. Thus, it requires 4 faces.
Consequently, Brochure that is printed only in one face can be designed into: one page or you can call it single panel.
If you are using your own home printer to create a brochure, it is suggested that you use only a single face brochure because printing double sides is difficult. Bear in mind, Two sided brochure is easy to make when printed using special commercial printers. It may not be folded but it can be roll fold.
Two sided brochure design can implement sizes layouts like bifold, trifold (3 fold / three panel / tri fold / 3 panel), 6 panel, half fold, and any that is folding layout. This brochure templates google docs offer is useful.
Simple and Blank Templates are easier to edit
Admittedly, for some people using simple blank brochure template is preferred because the design is still clean. Hence, they can start putting in their imagination and creativity into the printable area. They can choose landscape or tabloid or portrait layout.
For some other people using brochure templates with ready to use panels and images and text heading is preferred because they want it fast.
Pamphlet template google docs
If you are looking for pamphlet template google docs, then you actually searching for the brochure templates. Here in this page we provide you with various kinds of pamphlet template google docs that you can edit easily and fast. pamphlet template google drive offers for you will make your making brochure using free application by google drive much easier in no time.
Apps to create or edit brochure templates
Microsoft Words, Power Points, Publisher
To create a brochure or to edit an existing brochure template, you can use any app convenient to you. If you have a microsoft office subscription, you use Microsoft Word, Microsoft Power Point (PPT), and Microsoft Publisher. In my opinion, based on my own experience, creating and editing graphic design and layout arrangement is easier when using power point and publisher. Similarly, it is possible to create brochure design layouts using Word, but I don’t like it although many people do. Maybe because using Word to create brochure is what they know so far. They have never tried power point or publisher. However, I believe if they want to try using power point or publisher, they start loving it.
Google Docs and Google Slides
For those who like to use free software / app, they can use Google Drive apps like Google Docs and Google Slide. Google Docs is like Microsoft Word. They are basically word processor apps. However, my experience says that using Microsoft Word is much preferable that using Google Docs, but for basic purposes, Google Docs is more than enough, and thus you can create brochure in google docs right away. Google Slide is like power point. In my opinion, both are OK.
Adobe Photoshop, Indesign, Illustrator, and Corel Draw
Advanced users, mostly, like to use sophisticated apps like Photoshop PSD, Corel Draw, Adobe Illustrator, and Adobe Indesign. They are all for highly experienced designers who need lots of tools to create advanced layouts and designs.
Above all, For most of us, information that we deliver is the main value and the most important part, while I cannot deny that advanced design may attract more interest.
pamphlet template google slides
This is just another name for brochure template. If you try to find pamphlet template google slides, you will end up here because actually the are the same thing but different terms.
leaflet template google docs
In the upcoming moment, I would like to also provide you with leaflet template google docs. You will be able to browse, select, and download or copy leaflet template google docs so that you can use it further for real usage. I am sure that by adding leaflet design, it will enrich the collection of leaflet template in this page.
Google drive brochure templates
In this page you can find google drive brochure templates that you can customize for your professional and commercial project. You can promote your business using some of our selected google drive brochure templates. You don’t have to have a professional graphic design editing tool to modify the content of the templates that we offer here. All you need to have is a Google account. Once you have your own google account, you will have an access to your google drive account and thus you will be able to further adjust the google drive brochure templates based on your purposes.
Google Docs Brochure Maker
You don’t need a Google Docs Brochure maker, you can use these brochure templates instead. They come in good designs. They are easy to edit.
Google Docs Brochure Maker is a free tool that lets you create professional-looking brochures, flyers, and other marketing materials for free. It’s especially good for creating brochures because it works with Google Sheets, which is an online spreadsheet tool. This makes it easy to create a brochure with all the different pieces of information you need.
One of the best things about using Google Docs Brochure Maker is that it’s completely free. There are no fees to download or use it, so you can use it whenever and however you want.
Another nice thing about Google Docs Brochure Maker is that it lets you design your brochure how you want to. You can add as much information as you want in each section, and you can make the layout look as professional or informal as you like.
It’s also easy to use, so even if you aren’t a technical person, you should be able to figure out how to use it in no time at all.
Yes, Google docs have some brochure templates, but they are plain and you may want to use those created by users. Here is an example of blank brochure template by Google Docs.
Yes, you can find a free trifold brochure template in Google drive. here is one example: Trifold brochure template.
Yes, here we provide google docs brochure that is free for you to edit, print, or share. There are professional templates that are easy to edit. Here are they in this page.
in conclusion, with good brochure templates docs and creativity, even the simple app like power point and google slide can bring a powerful and standing out brochure design that will impress the viewers and readers. enjoy the online brochure template google docs.
Next, want to know how to make brochure in google docs? making brochures in google docs is easy.
How to Make a Trifold Brochure in Google Docs. A brief, efficient, and effective tutorial to get started with brochure in google docs. You can create brochure for your own business like travel, or other services.
Differences between a brochure, pamphlet, and handout
Often did my students ask me the difference among them, and based on what I have explored, the difference is in their content, purpose, and format.
In my opinioin, a brochure is a multi-page pamphlet used to directly promote or market items or services. This is because I often found items like Photographs, graphics, slogans, and ad language, that I suspect, are commonly used to attract clients. I can assure that brochures are more promotional and advertising-oriented; they include a range of themes to enlighten readers about specific items or services.
My students then asked me about pamphlet. I think Pamphlet, In contrast, is often a single sheet of paper that may be folded into parts. Pamphlets provide educational material produced by specialists in their subject. They are more educational in character and seek to enlighten rather than sell anything. Trust me, you will likely find this in schools. Pamphlets provide thorough information on a single subject, and I could say that it is great medium for teaching readers and creating awareness about specific themes.
Handout: A handout is a broad phrase that refers to any instructional document provided by hand (I often used this in my class whenever I got new materials that I wanted to share). It may consist of brochures, pamphlets, flyers, or leaflets. Handouts are often single-page pamphlets meant to swiftly communicate basic information. They are, as what I found in my circumstance, widely used in educational settings, events, or presentations.